Create Your Own Sound Waves with the Laser Synthesizer from CrunchLabs
- Uri Glas
- Feb 2
- 4 min read

Sound is all around us, but understanding how it works can be a challenge. The Laser Synthesizer from CrunchLabs offers a hands-on way to explore sound waves, frequency, and amplitude by building your own electronic instrument. This kit combines audio synthesis with laser visualization, making the invisible patterns of sound visible and interactive. Whether you are a hobbyist, student, or curious learner, this device opens a new world of sound and light to discover.

How the Laser Synthesizer Works
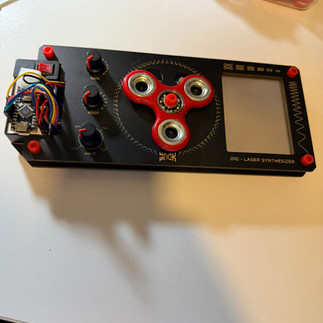
At its core, the Laser Synthesizer is an electronics kit that lets you build a device capable of creating and visualizing sound waves. It uses a microcontroller to generate audio signals based on user input from sensors and controls. These signals drive a speaker that produces sound, while a laser pointer reflects off a mirror attached to the speaker’s diaphragm. The vibrations of the speaker cause the mirror to move, creating a dynamic laser pattern on a surface.
This pattern is known as a Lissajous curve, a shape that changes depending on the frequency and amplitude of the sound waves. Watching these curves helps users see how sound behaves in real time, linking the auditory experience with visual feedback.
Core Controls and Their Functions
The Laser Synthesizer offers several controls that allow you to shape the sound and its visualization:
GAIN
This control adjusts the volume by scaling the audio signal. Increasing the gain too much causes the signal to clip, producing a crunchy, distorted sound. This effect can be used creatively to add texture to your audio.
ROOT
This selects the second note played from a preset musical scale when you use the touch pad. Changing the root note lets you explore different harmonies and musical moods.
WAVE
This alters the waveform used to generate the audio. Different waveforms—such as sine, square, or triangle—give the sound distinct qualities, from smooth tones to sharp, edgy sounds.
Touch Pad
The touch pad detects finger position using electrical resistance. Moving your finger along the X-axis (right to left) increases the volume of the root note, while moving it along the Y-axis (up) raises the pitch of the main note. This intuitive control lets you play melodies and adjust dynamics with your fingertips.
Proximity Sensor
A spinner on the board interacts with this sensor. As the spinner passes over the sensor, the volume reduces, adding an expressive element to your performance.
Together, these controls provide a rich interface for experimenting with sound and learning how different parameters affect audio output.
The Science Behind the Sound and Light
The Laser Synthesizer uses a microcontroller to read input from sensors and generate audio signals through internal oscillators. These signals are amplified to power an electromagnet inside the speaker, which moves a diaphragm to create sound waves. The laser pointer shines on a mirror attached to a silicone membrane on the speaker’s back. As the diaphragm vibrates, the mirror moves, reflecting the laser beam in patterns that correspond to the sound waves.
This setup turns sound into light patterns, making it easier to understand concepts like frequency, amplitude, and resonance. For example, higher frequencies produce faster-moving laser patterns, while louder sounds create larger movements in the reflected beam.
Customization and Hacking Opportunities
One of the most exciting aspects of the Laser Synthesizer is its openness to modification. Users can dive into both software and hardware hacking to expand the device’s capabilities:
Software Modifications
The kit comes with an integrated development environment (IDE) that allows you to change the code running on the microcontroller. You can create new musical scales, build chord progressions, generate sequences, or combine waveforms for unique sounds. This flexibility makes it a great learning tool for programming and digital audio synthesis.
Hardware Additions
Beyond software, you can add components like ultrasonic distance sensors to introduce new ways of controlling sound. For example, an ultrasonic sensor could detect hand movements above the device to change pitch or volume, adding a gesture-based interface.
These customization options encourage creativity and deeper understanding of electronics and sound design.
Practical Uses and Learning Benefits
The Laser Synthesizer is more than a toy; it’s a practical educational tool that helps users grasp complex concepts through direct interaction. Here are some ways it benefits learners and creators:
Visualizing Sound Waves
Seeing sound waves as laser patterns helps users connect abstract audio concepts with physical phenomena.
Hands-On Electronics
Building the kit teaches soldering, circuit design, and microcontroller programming.
Music Exploration
Experimenting with waveforms, scales, and controls encourages musical creativity and ear training.
STEM Education
The device integrates science, technology, engineering, and math in a fun, accessible way.
Creative Expression
Users can compose unique sounds and light shows, blending technology with art.
Getting Started Tips
If you decide to build the Laser Synthesizer, here are some tips to make the process smoother:
Follow the Instructions Carefully
The kit includes detailed assembly guides. Take your time to avoid mistakes.
Experiment with Controls Early
Once assembled, try adjusting GAIN, ROOT, and WAVE to hear how each affects sound.
Use the Touch Pad to Play
Practice moving your finger on the touch pad to control pitch and volume dynamically.
Observe the Laser Patterns
Watch how changes in sound affect the laser’s movement. Try different surfaces for reflection.
Explore the Code
If you have programming experience, start modifying the code to create new sounds or behaviors.
Add Sensors Gradually
If you want to expand hardware, start with simple additions like an ultrasonic sensor and test thoroughly.


Comments